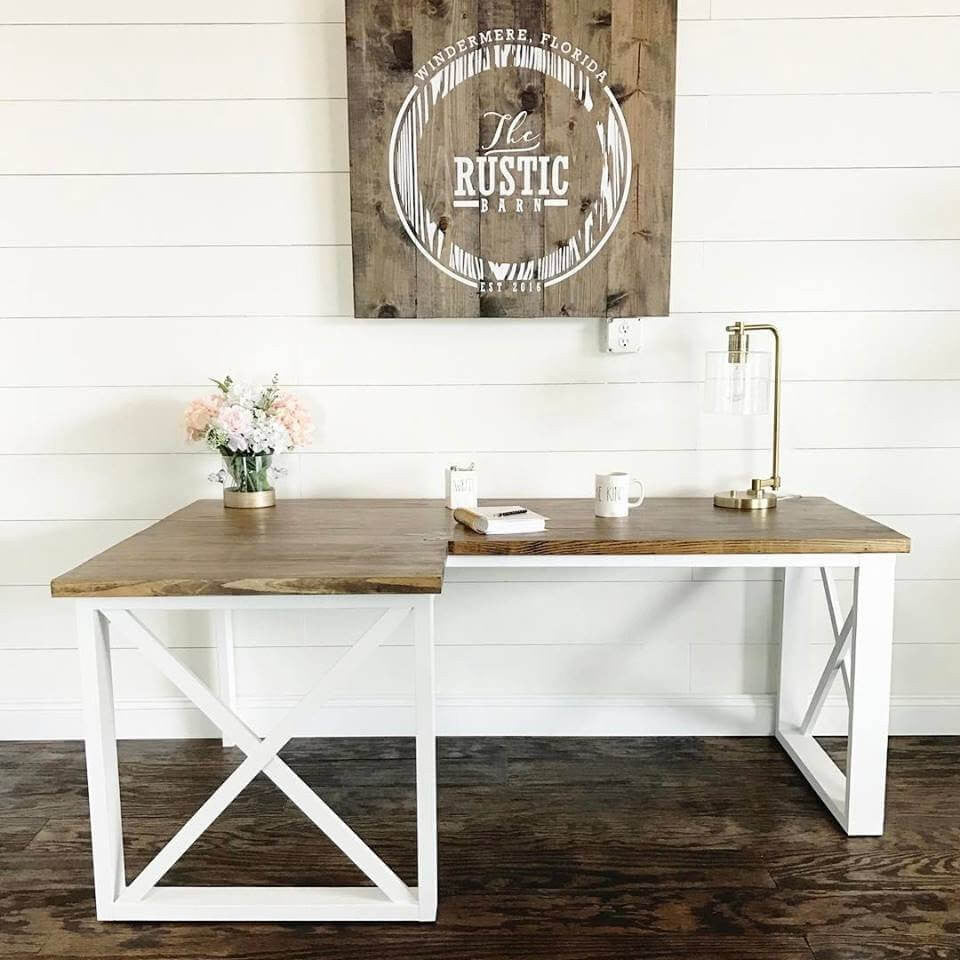
To build an L shaped desk, measure and cut the pieces of wood for the desk frame and top, assemble the frame, attach the top, and add any desired features such as drawers or shelves. Building your own L shaped desk can be a rewarding and cost-effective project.
Whether you need a spacious work surface for your home office or want to customize a desk to fit your specific needs, constructing an L shaped desk allows you to create a functional and stylish workspace. We will guide you through the process of building your own L shaped desk.
With some basic woodworking skills and a few tools, you can create a desk that suits your taste and enhances your productivity. So let’s dive into the step-by-step instructions to help you build your own L shaped desk.
Table of Contents
- Choosing The Right Materials For Your L Shaped Desk
- Essential Tools And Equipment For Building An L Shaped Desk
- Steps To Prepare And Cut The L Shaped Desk Pieces
- Joining And Assembling The L Shaped Desk
- Optional Customizations And Functional Features For Your L Shaped Desk
- Frequently Asked Questions Of How To Build An L Shaped Desk
- Conclusion
Choosing The Right Materials For Your L Shaped Desk
When it comes to building an L shaped desk, one of the most important considerations is choosing the right materials. Whether you prefer the classic beauty of wood or enjoy experimenting with alternative materials, selecting the right materials will ensure a sturdy and visually appealing desk that fits your style and needs. In this section, we will explore the considerations for selecting the ideal wood or alternative materials, as well as the different types of finishes and their pros and cons. Additionally, we will provide you with tips for calculating the required amount of materials to make the construction process smooth and hassle-free.
Considerations For Selecting The Ideal Wood Or Alternative Materials
When it comes to choosing the materials for your L shaped desk, you have two primary options: wood or alternative materials. Here are some key factors to consider:
- Durability: Wood is known for its durability and strength, making it the preferred choice for many DIY enthusiasts. However, alternative materials such as plywood or MDF can also offer sufficient durability at a lower cost.
- Aesthetics: Wood brings a timeless and natural beauty to any space. Different wood types, such as oak, maple, or walnut, offer unique grains and colors that can be tailored to match your style preferences. On the other hand, alternative materials can be laminated or painted to achieve a variety of finishes.
- Cost: Wood can be more expensive compared to alternative materials. If you are on a budget, consider exploring cost-effective alternatives like plywood or MDF without compromising on quality.
- Weight: Wood is generally heavier than alternative materials, which may affect the mobility of your desk. If portability is a requirement, consider lighter alternatives that still offer stability.
By considering these factors, you can make an informed decision when selecting the ideal wood or alternative materials for your L shaped desk.
Different Types Of Finishes And Their Pros And Cons
The choice of finish plays a significant role in determining the overall look and durability of your L shaped desk. Here are some common types of finishes along with their pros and cons:
- Stained finish: This finish enhances the natural beauty of wood by adding color while allowing the grain to show through. Pros: Highlights wood’s natural features and offers a timeless look. Cons: Requires regular maintenance to prevent fading or wear.
- Painted finish: Painting your desk offers endless possibilities in terms of color and style. Pros: Allows for customization and can cover any imperfections on the surface. Cons: May hide the natural beauty of wood or alternative materials.
- Lacquer finish: A lacquer finish provides a protective coating and a glossy appearance. Pros: Offers great durability and resistance to scratches. Cons: Difficult to repair if damaged and may require professional assistance.
- Oil finish: This type of finish brings out the natural beauty of wood while providing protection. Pros: Easy to apply and repair, enhances wood’s natural qualities. Cons: Requires occasional reapplication.
Each finish type has its advantages and disadvantages, so consider your personal preferences and how much maintenance you are willing to undertake when making your decision.
Tips For Calculating The Required Amount Of Materials
Before you start building your L shaped desk, it’s crucial to calculate the required amount of materials accurately. Here are some tips to help you with this process:
- Measure twice: Take precise measurements of the desk dimensions, including the length, width, and height. Double-check your measurements to avoid costly mistakes.
- Consider material thickness: Take into account the thickness of the materials you are using, whether it’s wood or an alternative material. This will impact the quantity required for the project.
- Account for wastage: It’s always wise to add a little extra material to account for wastage during cutting and unforeseen mistakes.
- Consult a materials chart: Check manufacturer websites or consult a materials chart to determine how much material you will need based on the dimensions you’ve measured.
By following these tips, you can ensure that you have the correct amount of material for your L shaped desk project.
Essential Tools And Equipment For Building An L Shaped Desk
When it comes to building your own L shaped desk, having the right tools and equipment is essential for a smooth and successful construction process. By having everything you need at hand, you can breeze through the project with ease and precision. In this article, we will provide you with a comprehensive list of the necessary tools, along with recommendations for budget-friendly options and safety gear to ensure a safe and enjoyable construction experience.
A Comprehensive List Of The Necessary Tools
To get started on building your L shaped desk, you will need the following tools:
| Tool | Description |
|---|---|
| Power drill | A power drill will be your go-to tool for making pilot holes and attaching screws to secure the various components of the desk. |
| Measuring tape | This essential tool will help you accurately measure and mark the dimensions of the desk to ensure a proper fit and alignment. |
| Saw | Whether you choose a circular saw, miter saw, or table saw, having a saw will enable you to cut the wooden boards and panels to the desired sizes for your desk. |
| Screwdriver set | A quality set of screwdrivers, both Phillips and flathead, will be indispensable for assembling and tightening screws. |
| Clamps | Clamps will help hold the pieces of the desk together securely while you work on attaching them, ensuring accuracy and stability. |
| Sanding block or sandpaper | To achieve a smooth and polished finish, a sanding block or sandpaper of various grits will come in handy to remove any rough edges or imperfections. |
| Level | Using a level will help ensure your desk is perfectly balanced and even, providing a sturdy and level surface to work on. |
Safety Gear And Precautions For A Smooth Construction Process
When engaging in any DIY project, including building an L shaped desk, safety should be your top priority. To protect yourself and ensure a smooth construction process, consider the following safety gear and precautions:
- Protective goggles: Wearing goggles will shield your eyes from flying debris and wood dust.
- Dust mask: Prevent inhalation of harmful dust particles by wearing a dust mask throughout the construction process.
- Ear protection: Construction can be noisy, so wearing ear protection will safeguard your hearing.
- Gloves: To prevent injuries and provide better grip, consider wearing work gloves when handling tools and materials.
- Work in a well-ventilated area: Proper ventilation will help dissipate any fumes or dust generated during the construction process.
Recommendations For Budget-friendly Options
If you’re working on a tight budget, there are affordable alternatives available that still provide quality and functionality. Consider the following budget-friendly options:
- Used tools: Look for used tools in good condition from local classifieds or online marketplaces. Often, you can find reliable tools at a fraction of the cost.
- Borrow from friends or family: If you don’t have certain tools, consider borrowing them from friends or family who might already own them. This can save you money while still getting the job done.
- Rental services: For specialized tools that you may not need on a regular basis, consider renting instead of purchasing them. This way, you can use high-quality tools without breaking the bank.
- DIY modifications: Instead of purchasing expensive clamps or sanding blocks, consider making your own using readily available materials. You can find DIY tutorials online that provide cost-effective alternatives.
By utilizing these budget-friendly options, you can build your L shaped desk without compromising on quality or functionality.
Steps To Prepare And Cut The L Shaped Desk Pieces
To build an L-shaped desk, start by carefully preparing and cutting the necessary pieces. Follow the steps to ensure accurate measurements and precise cuts, resulting in a sturdy and functional desk.
Measuring And Planning The Dimensions For Your Desk
Before you start building your L shaped desk, it’s essential to measure and plan the dimensions of the desk. This step will ensure that your desk fits perfectly in your space and meets your specific needs. Here are a few steps to help you with this process:
1. Measure your available space: Begin by measuring the area where you intend to place your desk. Take accurate measurements of the length, width, and height to ensure your desk fits perfectly.
2. Consider your workflow: Think about how you will be using your desk. Will you need ample workspace for a computer, a printer, or other equipment? Keep these requirements in mind while planning the dimensions of your desk.
3. Sketch a design: Once you have your measurements and requirements in mind, sketch a rough design of your desk. This will help you visualize the final product and identify any potential issues before you start cutting the materials.
Cutting And Shaping The Desk Surface And Sides
Now that you have your measurements and a rough design, it’s time to cut and shape the pieces for your L shaped desk. Follow these steps to ensure a precise and professional finish:
1. Gather your materials: Before you start cutting, make sure you have all the necessary materials for your desk, including the desk surface, sides, and support beams. Double-check your measurements to ensure you have enough material.
2. Mark your cuts: Using a measuring tape and a pencil, mark the dimensions for each piece of your desk according to your design. Double-check your measurements to avoid any mistakes.
3. Cut your pieces: Use a saw or a similar cutting tool to cut along the marked lines. Take your time and make precise cuts to ensure a clean and accurate result. Remember to follow proper safety precautions while using cutting tools.
Sanding And Finishing Techniques For A Professional Look
Now that you have cut and shaped your desk pieces, it’s time to sand and finish them for a professional and polished appearance. Follow these steps to make your desk look top-notch:
1. Smooth the surfaces: Use sandpaper or a sander to smooth any rough edges or surfaces on your desk pieces. Start with a coarse grit sandpaper and gradually switch to a finer grit for a smoother finish.
2. Remove dust: After sanding, clean the surfaces thoroughly to remove any dust or debris. Use a brush or a cloth to ensure the surfaces are clean and ready for finishing.
3. Apply the finish: Choose a finish that suits your style and preferences. Whether it’s paint, stain, or varnish, carefully apply the finish to your desk pieces using a brush or a roller. Follow the manufacturer’s instructions for the best application technique.
4. Let it dry: Allow the finish to dry completely before assembling your desk. This will ensure a durable and long-lasting result.
By following these steps, you’ll be well on your way to building a beautiful and functional L shaped desk. Remember to measure accurately, cut precisely, and finish carefully, and you’ll have a desk that fits perfectly in your space and meets all your needs.
Joining And Assembling The L Shaped Desk
When building your own L shaped desk, the process of joining and assembling the desk pieces requires careful attention to detail. In this section, we will discuss different methods for joining the desk pieces, securing the stability and durability of the desk, as well as provide tips for proper alignment and assembly techniques. By following these guidelines, you can create a sturdy and functional L shaped desk that caters to your work needs.
Different Methods For Joining The Desk Pieces
There are various methods you can use to join the different pieces of your L shaped desk. Let’s explore a few popular ones:
- Miter joint: This method involves cutting the ends of the two desk pieces at a 45-degree angle and joining them together. It provides a seamless look and is commonly used for wooden desks.
- Butt joint: Simple yet effective, this method involves joining two desk pieces by connecting their square ends. To enhance stability, you can reinforce this joint with screws or dowels.
- Biscuit joint: This technique involves cutting slots into the desk pieces and inserting biscuits (small wooden discs) that expand when glued, creating a strong bond. Biscuit joints are commonly used for tabletops and provide excellent alignment and stability.
Securing The Stability And Durability Of The Desk
Ensuring the stability and durability of your L shaped desk is crucial for providing a solid workspace. Here are some essential steps to achieve this:
- Use sturdy materials: Opt for high-quality wood or composite materials that can withstand the weight of your equipment and provide long-lasting durability.
- Reinforce joins: Strengthen the joins between desk pieces with screws, dowels, or metal brackets. This will enhance stability and prevent wobbling or sagging over time.
- Apply appropriate finishes: Protect your desk from scratches and moisture damage by applying a suitable finish, such as varnish or paint. This will prolong its lifespan and maintain its aesthetic appeal.
Tips For Proper Alignment And Assembly Techniques
Proper alignment and assembly techniques are essential to create a functional and visually appealing L shaped desk. Consider the following tips:
- Measure twice, cut once: Accurate measurements are crucial to ensure precise alignment of the desk pieces. Double-check your measurements before cutting and assembling.
- Use clamps: Clamping the desk pieces together during assembly will help maintain alignment and prevent movement while glue or screws are being applied.
- Follow the manufacturer’s instructions: If you’re using pre-fabricated desk pieces or a DIY kit, carefully follow the provided instructions to ensure proper assembly and alignment.
By following these suggestions, you can build an L shaped desk that not only functions efficiently but also looks aesthetically pleasing in your workspace. Remember, the key is to take your time, pay attention to details, and prioritize stability and durability.
Optional Customizations And Functional Features For Your L Shaped Desk
When it comes to crafting the perfect workspace, customizations and functional features can make a world of difference. Building an L shaped desk provides ample space, but why settle for just the basic design? Let’s explore some optional customizations and functional features you can incorporate into your L shaped desk to truly enhance your productivity and create a personalized workstation.
Adding Built-in Drawers, Shelves, Or Compartments
Maximize your storage options by incorporating built-in drawers, shelves, or compartments into your L shaped desk. With these features, you can keep your workspace clutter-free and have easy access to all your essentials. Here are a few ways you can make the most of these additions:
- Drawers: Include one or more built-in drawers to keep important documents, stationary, or small devices neatly organized. This will help you maintain a clean and tidy workspace while having everything you need within reach.
- Shelves: Install open or closed shelves above or below the desk surface. This is a great option for displaying books, decorative items, or storing frequently used materials, freeing up your desk space for tasks that require your immediate attention.
- Compartments: Create specialized compartments to accommodate items like a printer, scanner, modem, or power strip. By dedicating specific spaces for these devices, you can keep unsightly cables and cords out of sight while maintaining a visually pleasing and organized setup.
Incorporating Cable Management Solutions
No one wants a mess of tangled cords and cables ruining the aesthetics of their workspace. That’s where cable management solutions come in handy. Here’s how you can integrate them into your L shaped desk:
- Cable trays: Attach cable trays underneath the desk surface to keep all your cables neatly organized and out of sight. This ensures a clean and clutter-free workspace, allowing you to focus on your tasks without distractions.
- Cord clips and cable sleeves: Use cord clips or cable sleeves to secure and bundle cables together. This prevents them from tangling and provides a clean and professional look to your desk setup.
- Wire grommets: Install wire grommets on the desk surface to create openings for cables to pass through. This not only helps with cable management but also allows for easy connectivity to your devices.
Enhancing Ergonomics And Personalizing Your Workspace
In addition to customizations and functional features, it’s important to prioritize ergonomics and personalize your workspace. Here are a few ideas to help you achieve an ergonomically friendly and personalized L shaped desk:
- Adjustable height: Opt for a desk with an adjustable height feature, allowing you to switch between sitting and standing positions. This helps reduce the strain on your body and promotes a healthier posture.
- Ergonomic accessories: Consider adding ergonomic accessories such as an adjustable monitor arm, an ergonomic keyboard tray, or a comfortable chair to maximize comfort and minimize the risk of repetitive strain injuries.
- Personalized decorations: Add a touch of your personality to your L shaped desk by incorporating personalized decorations such as photos, artwork, or motivational quotes. This creates a positive and inspiring work environment.
By incorporating these optional customizations and functional features into your L shaped desk, you can create a workspace that not only caters to your unique needs but also boosts your efficiency and productivity. Take the time to explore these possibilities and build a desk that perfectly aligns with your work style and preferences.

Credit: www.youtube.com
Frequently Asked Questions Of How To Build An L Shaped Desk
What Is The Best Layout For An L Shaped Desk?
The best layout for an L shaped desk is one that maximizes your workspace and promotes efficiency. This includes placing your computer at a comfortable height, having ample space for documents and supplies, and ensuring easy access to frequently used items.
A well-organized, clutter-free setup will optimize productivity and ease of use.
How Do You Join Wood To An L Shaped Desk?
To join wood for an L-shaped desk, follow these steps: First, align the pieces in an L shape. Then, drill pilot holes at the joint and secure with screws. Use wood glue for added strength and stability. Finally, finish by sanding any rough edges and applying a protective coat.
What Are The Measurements For An L Shaped Standing Desk?
The measurements for an L shaped standing desk vary, but usually the longer side is around 60 inches and the shorter side is around 48 inches. However, dimensions can differ depending on the manufacturer and model. It’s always best to check the specifications of the specific desk you’re interested in.
Is An L Shaped Desk Worth It?
An L-shaped desk is worth it because it offers ample space for multitasking and organizing items. It allows you to maximize your workspace without taking up too much room. Additionally, it promotes better ergonomics and can accommodate multiple monitors. Its versatility and functionality make it a valuable investment.
Conclusion
Building an L shaped desk can be a rewarding DIY project that allows you to customize your workspace to fit your needs. By following the step-by-step instructions provided in this blog post, you can create a functional and stylish desk that maximizes space and enhances productivity.
Remember to choose high-quality materials, measure carefully, and take your time during the construction process. Enjoy the satisfaction of completing a project that is both practical and visually appealing. Start building your dream desk today!