To build drawers for a desk, measure and cut the necessary pieces of wood, construct the frame and attach the slides.
Table of Contents
Step 1: Gathering Materials
Before you can start building drawers for your desk, it’s important to gather all the necessary materials. This step is crucial in ensuring a smooth construction process and a sturdy final product. In this article, we will take a detailed look at the materials needed for building drawers, including the right type of wood, the essential tools and equipment, as well as the various options for drawer slides and hardware.
Choosing The Right Wood For Your Drawer Project
When it comes to selecting the wood for your drawer project, it’s essential to choose a material that is both durable and aesthetically pleasing. The type of wood you choose will greatly impact the overall quality and longevity of your drawers. Here are some popular options:
| Wood Type | Description |
|---|---|
| Hardwood | Hardwoods like oak, maple, and birch are commonly used for their strength and durability. They are more resistant to wear and tear, making them suitable for heavy-duty drawers. |
| Softwood | Softwoods such as pine and cedar are lighter and easier to work with. They are ideal for lighter drawers and projects where weight is a concern. |
| Plywood | Plywood is a versatile option that offers both affordability and stability. It consists of multiple layers of thin wood pressed together, providing strength and resistance to warping. |
Essential Tools And Equipment Needed For Drawer Construction
Before you begin building your drawers, it’s important to have the necessary tools and equipment readily available. These tools will help you achieve precise and accurate results. Here are some essential tools you will need:
- A tape measure or ruler
- A saw (such as a circular saw or a table saw) for cutting the wood
- A drill for making holes
- Screwdrivers or a power screwdriver for assembling the drawers
- Sandpaper or a sander for smoothening the wood surfaces
- Clamps for securing the pieces together
- A level for ensuring straight and balanced drawers
Exploring Different Types Of Drawer Slides And Hardware Options
Drawer slides and hardware play a crucial role in the functionality and smooth operation of your drawers. There are several options available, each with its own advantages and limitations. Here are some commonly used types of drawer slides:
- Side-mount slides: These slides attach to the sides of the drawers and the cabinet, allowing the drawer to slide in and out smoothly.
- Undermount slides: These slides are hidden from view when the drawer is closed, providing a clean and seamless appearance.
- Center-mount slides: These slides are installed centrally beneath the drawer and provide stability and balance.
In addition to slides, you will also need various hardware such as knobs or pulls to open and close the drawers. You can choose from a wide range of styles and finishes to match your overall desk design.
By gathering the right materials, tools, and hardware, you will be well-prepared to start building drawers for your desk. In the upcoming steps, we will dive deeper into the construction process, ensuring you have all the information and guidance you need to successfully complete your drawer project.
Step 2: Measuring And Planning
Once you have determined the overall design and style of your desk, it’s time to move on to the crucial step of measuring and planning to ensure precision and functionality in building your drawers. This step involves measuring the dimensions of your desk, determining the appropriate drawer size, calculating the amount of wood needed, and sketching a detailed plan for the drawer design and layout.
Measuring The Dimensions Of Your Desk And Determining Drawer Size
Before diving into the construction process, it’s essential to accurately measure the dimensions of your desk to ensure that the drawers will fit seamlessly within the available space. Start by measuring the width, depth, and height of the desk, taking into account any existing obstacles or features that might impact drawer placement.
Once you have the measurements, it’s time to determine the size of the drawers. Consider your specific needs and the items you plan to store in the drawers. Will you need shallow drawers for documents or deep drawers for bigger items? Take into account the overall dimensions of the desk and aim for a design that maximizes storage while maintaining a proportional look.
Calculating The Amount Of Wood Needed For The Drawer Construction
To ensure a smooth construction process, it’s crucial to calculate the amount of wood needed for building the drawers. This step prevents waste and helps you budget accordingly. Start by determining the dimensions of each drawer, including the height, width, and depth.
| Drawer | Height (in inches) | Width (in inches) | Depth (in inches) |
|---|---|---|---|
| Drawer 1 | 6 | 12 | 16 |
| Drawer 2 | 8 | 12 | 16 |
| Drawer 3 | 10 | 12 | 16 |
For example, let’s assume you plan to build three drawers with the following dimensions:
- Drawer 1: 6 inches in height, 12 inches in width, and 16 inches in depth
- Drawer 2: 8 inches in height, 12 inches in width, and 16 inches in depth
- Drawer 3: 10 inches in height, 12 inches in width, and 16 inches in depth
By summing up the total volume of wood required for all the drawers, you can calculate the amount needed. Keep in mind that it’s wise to account for some additional wood for drawer fronts, hardware, and any potential mistakes.
Sketching A Detailed Plan For The Drawer Design And Layout
Now that you have the measurements and wood requirements sorted, it’s time to sketch a detailed plan for the design and layout of your drawers. This step ensures that you have a clear vision of how the drawers will look and function within the overall desk structure.
Start by creating a rough sketch of the desk and divide it into sections according to your drawer placement. Take into consideration the sizes and dimensions decided upon earlier, and allocate enough space between each drawer, allowing for smooth operation.
You can also include additional details in your sketch, such as the desired materials, hardware specifications, and any specific design elements you want to incorporate. This detailed plan will serve as a valuable reference throughout the construction process, ensuring accuracy and clarity.
Step 3: Cutting And Preparing Wood
Once you have gathered all the necessary materials and designed your drawer, it’s time to move on to the next crucial step: cutting and preparing the wood. This step requires precision and attention to detail to ensure your drawers come out as desired. Here’s how you can accomplish this step with finesse.
Preparing The Wood By Cutting It To The Necessary Dimensions
In this stage, you will need to cut the wood into the correct dimensions according to your drawer design. Measure twice and cut once to ensure accuracy.
- Start by measuring and marking the dimensions on the wood using a measuring tape and a pencil.
- Use a circular saw, table saw, or jigsaw to make the cuts. Make sure to follow safety guidelines and wear appropriate protective gear.
- Trim off any excess wood carefully and precisely, sticking to the marked lines.
- Smooth the edges using a sandpaper or router to avoid any splinters.
Sanding And Smoothing The Edges And Surfaces Of The Wood Pieces
After cutting the wood to the required dimensions, it is essential to sand and smooth the edges and surfaces of the wood pieces. This will ensure the drawers have a neat and professional finish.
- Start by sanding the edges of the wood using sandpaper with a fine grit (around 120-180).
- Hold the sandpaper firmly and move it in a circular motion along the edges to remove any roughness or imperfections.
- Next, sand the surfaces of the wood pieces to achieve a smooth texture. Start with a coarser grit sandpaper (around 80-100) and gradually switch to a finer grit (around 220) for a polished finish.
- Remember to wipe away any sawdust from the wood using a clean cloth before moving on to the next step.
Making Necessary Adjustments And Corrections In Case Of Any Errors
Even with careful planning and execution, errors can sometimes occur during the cutting and preparation process. It is important to identify and address these issues promptly to ensure the drawers function properly and align with your design vision.
- Inspect the wood pieces for any gaps or misalignments that may affect the overall structure and functionality of the drawers.
- If you encounter any errors, make necessary adjustments by trimming the wood, sanding the affected area, or even recutting the piece if required.
- Remember, patience and attention to detail are key when making corrections to achieve a flawless end result.
By following these steps, you are well on your way to building sturdy and stylish drawers for your desk. In the next section, we will delve into the final assembly and installation process, bringing your fully functional drawers to life. Stay tuned!
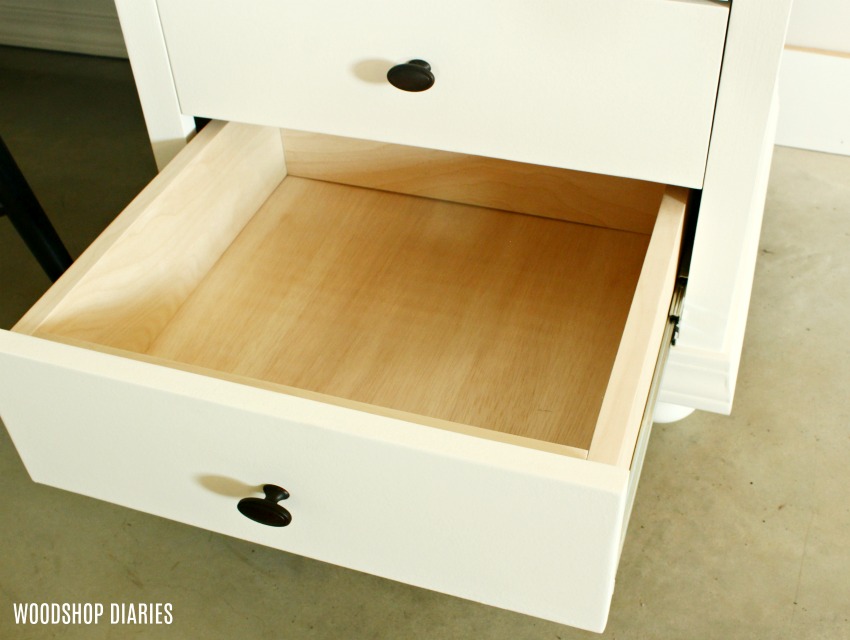
Step 4: Assembling The Drawers
Credit: www.chiselandfork.com
Once you have constructed the individual components of the drawers, it is time to bring them together and assemble them. This step will involve joining the main body of the drawer, attaching the drawer slides, and installing the drawer fronts and handles. Read on to learn how to complete each of these tasks efficiently and achieve a professional finish for your desk drawers.
Constructing The Main Body Of The Drawer Using Dovetail Joints Or Other Joining Methods
To ensure the durability and strength of your desk drawers, it is essential to construct the main body of the drawer using robust joining methods. One popular method is the dovetail joint, known for its impressive sturdiness and resistance to pulling forces.
Implementing dovetail joints requires precision and skill. Below is an example of how you can create dovetail joints:
- Cut a series of interlocking shapes, resembling a dove’s tail, into the sides of the drawer front and back.
- Use a coping saw or dovetail saw to make the cuts, ensuring a tight fit that ensures stability and strength.
- Next, mark and chisel out corresponding recesses on the drawer sides, ensuring a snug fit for the dovetail joints.
- Lastly, apply a small quantity of wood glue to the joint, assemble the drawer pieces, and carefully clamp them together until the glue dries.
By utilizing dovetail joints or other strong joining methods, you can create drawers that withstand the test of time and daily use.
Attaching The Drawer Slides To Ensure Smooth Opening And Closing
Smooth and effortless opening and closing of your desk drawers are key to their functionality and user experience. Attaching drawer slides properly is crucial in achieving this. Follow these steps to ensure smooth drawer operation:
- Align the drawer slides evenly on both sides of the drawer opening, keeping them flush with the frame.
- Secure them in place using screws, typically provided with the drawer slide set.
- Repeat the process for the other side of the drawer opening, ensuring the slides are parallel and level.
- With the slides securely in place, test the drawer for smooth movement, making any necessary adjustments before proceeding.
Properly installed drawer slides will ensure that opening and closing your drawers becomes a seamless and effortless experience.
Installing Drawer Fronts And Handles For A Professional Finish
To give your desk drawers a polished and professional look, installing drawer fronts and handles is the final step. This will not only enhance the overall aesthetics but also provide a convenient grip for opening and closing the drawers.
Follow these simple steps to install the drawer fronts and handles:
- Ensure your drawer fronts are aligned and flush with the drawer body to maintain consistency.
- Using a drill or screwdriver, attach the drawer fronts securely to the drawer body using screws or other appropriate fasteners.
- Mark the desired positions for your drawer handles or knobs.
- Pre-drill holes for the drawer handles, ensuring they’re parallel to each other and centered on the drawer front.
- Finally, attach the handles or knobs, tightening them securely for a finished look.
By carefully installing the drawer fronts and handles, you will achieve a professional finish that adds both functionality and style to your desk.
Step 5: Finishing Touches
In the final step of building drawers for your desk, focus on the finishing touches that will bring your project to life. Pay attention to details such as hardware, sanding, and staining to achieve a polished and professional look.
Applying A Protective Finish To The Drawers To Enhance Durability
Once you have built your drawers for your desk, it’s important to give them a protective finish to ensure they stay in great condition for years to come. A protective finish not only enhances the durability of the drawers but also adds a touch of style to your desk. Here’s how you can apply a protective finish to your newly built drawers:
1. Prepare the surface: Before applying any finish, make sure the surface of the drawers is clean and free from dust and debris. Use a damp cloth to wipe away any dirt and allow the drawers to dry completely.
2. Choose the right finish: There are various finishes available, such as varnish, lacquer, or polyurethane. Consider the type of wood you used for your drawers and the desired look you want to achieve. Research the different finishes and choose the one that best suits your needs.
3. Apply the finish: Using a brush or a clean cloth, apply the finish evenly over the entire surface of the drawers. Make sure to follow the manufacturer’s instructions for proper application technique and drying time. Apply multiple coats if needed, allowing each coat to dry thoroughly before applying the next.
4. Smooth the surface: After each coat has dried, lightly sand the surface of the drawers with fine-grit sandpaper. This helps to remove any imperfections and create a smooth finish. Be sure to wipe away any dust before applying the next coat.
5. Protect the finish: Once the final coat has dried, consider adding a layer of wax or furniture polish to protect the finish and give it a beautiful shine. Apply the wax or polish according to the manufacturer’s instructions and buff it to a smooth finish using a soft cloth.
Testing The Drawers For Proper Functioning And Making Any Necessary Adjustments
Before mounting the completed drawers into your desk, it’s crucial to test them for proper functioning. You don’t want to realize any issues after the installation. Here’s how you can test and make any necessary adjustments to ensure your drawers work smoothly:
1. Check the alignment: Place the drawer into the desk opening and observe if it slides in and out smoothly. If the drawer is difficult to open or close, it may be misaligned. In this case, check the position of the glides or slides and adjust them if needed.
2. Test the slides: Open and close the drawer multiple times to test the slides or glides. Pay attention to any sticking, grinding, or unusual noises. If there are any issues, check the slides for debris or obstructions. Clean or lubricate them as necessary.
3. Inspect the drawer stops: Drawer stops prevent the drawers from being pulled out too far. Ensure that the stops are in place and functioning correctly. Adjust them if needed to prevent the drawers from falling out or getting stuck.
4. Check for wobbling: Gently shake the drawers from side to side to check for any wobbling or instability. If you notice any, tighten the screws or adjust the fittings to stabilize the drawers.
5. Make necessary adjustments: If you encounter any issues during the testing process, address them promptly. Whether it’s readjusting the slides, sanding down a tight spot, or replacing a faulty component, take the time to make the necessary adjustments for smooth functioning.
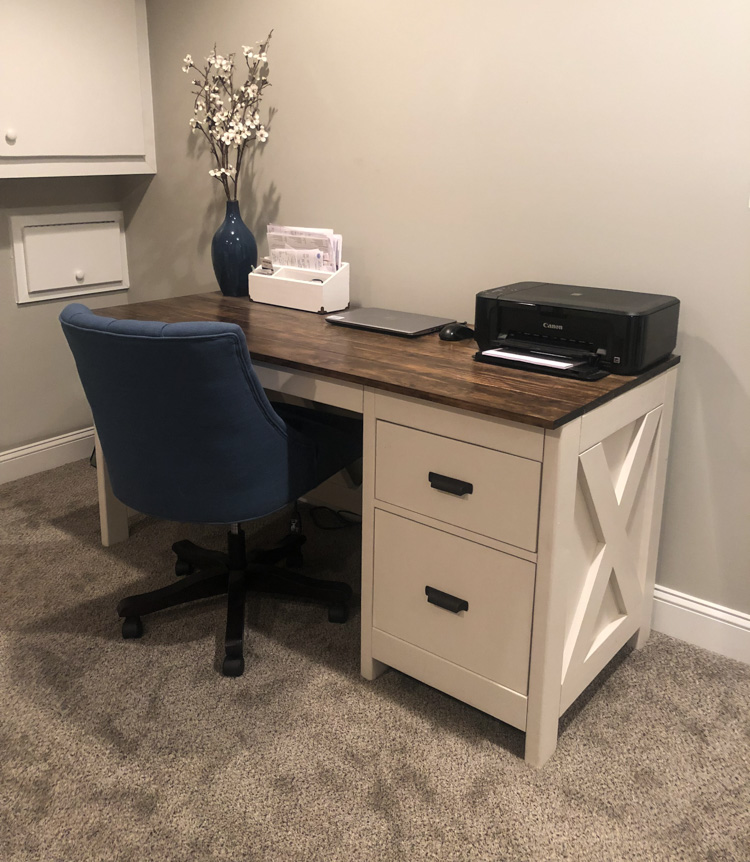
Mounting The Completed Drawers Into Your Desk And Enjoying Your Newly Built Storage Solution
Now that you have finished applying a protective finish, tested the drawers, and made any necessary adjustments, it’s time to mount the completed drawers into your desk. Follow these steps to ensure a successful installation:
1. Prepare the desk: Clear the desk surface and remove any obstacles or accessories that can interfere with the installation. Measure and mark the correct position for each drawer.
2. Attach the slides: Depending on the type of drawer slides you’ve chosen, follow the manufacturer’s instructions to attach them to both the drawers and the desk. Make sure the slides are aligned correctly and securely attached.
3. Insert the drawers: Carefully slide each drawer into its designated position on the desk, ensuring a smooth and snug fit. Double-check the alignment and make adjustments if necessary.
4. Test the functionality: Open and close each drawer to ensure they glide smoothly and operate properly. Check that the drawer stops engage correctly, preventing the drawers from opening too far.
5. Enjoy your newly built storage solution: With the drawers securely mounted and functioning perfectly, take a moment to appreciate the hard work you’ve put into creating a practical and stylish storage solution for your desk. Organize your items and revel in the convenience and beauty of your newly built drawers.
Building drawers for your desk is a rewarding DIY project that gives you extra storage and enhances the functionality of your workspace. By applying a protective finish, testing for proper functioning, and mounting the drawers correctly, you can ensure they will serve you well for years to come.
Frequently Asked Questions On How To Build Drawers For Desk
Can You Add Drawers To A Desk?
Yes, you can add drawers to a desk. This can help you organize your workspace and store items conveniently. It’s a simple process that can enhance the functionality and storage capacity of your desk.
Are Drawers Easy To Build?
Yes, drawers are easy to build. With basic woodworking skills and a few tools, you can easily construct drawers for various purposes. The process involves measuring, cutting, joining, and finishing the pieces, which can be done by following a step-by-step guide or tutorial.
How Do You Make Wooden Drawers?
To make wooden drawers, measure and cut the wood pieces for the sides, front, and back. Assemble the pieces using glue and screws. Attach a bottom panel, and add drawer slides for smooth opening and closing. Finish with sanding, staining, and applying a protective coat for durability.
How Do You Build Drawers For A Desk?
To build drawers for a desk, start by measuring the dimensions of the drawer opening. Cut the sides, front, back, and bottom pieces to the appropriate size. Assemble the pieces using glue and screws. Install drawer slides on the sides of the drawer opening and attach them to the sides of the drawer.
Finally, add the drawer front and secure it with screws.
Conclusion
Building drawers for a desk may seem like a daunting task, but with the right guidance, it can be a rewarding and practical project. By following the step-by-step instructions outlined in this blog post, you can create functional and stylish drawers that meet your storage needs.
Remember to choose the right materials, measure accurately, and pay attention to detail for a professional result. So, roll up your sleeves and get ready to build some fantastic drawers for your desk!